hamstank
New member
Hi all! Sorry it's been so long, but here's part 2 to the Dynamics Processors guide. There's also a little bit about routing. Again, this is based in Pro Tools for the most part but the concepts and ideas are applicable in any DAW. You can find part 1 here!
Other Guides:
EQ
Reverb
Delay, Chorus, Flanging, etc.
Lesson 4: EQ and Dynamics (Continued)
Cool Techniques with EQ and Dynamics
 Frequency: center of key signal filter Range: max amount of gain reduction HF Only: only compress HF
Subgroups

Other Guides:
EQ
Reverb
Delay, Chorus, Flanging, etc.
Lesson 4: EQ and Dynamics (Continued)
Cool Techniques with EQ and Dynamics
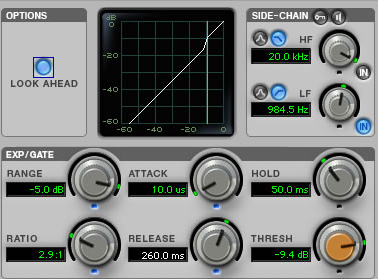
- Using Gates/Expanders for Emphasis
- Gates and expanders can be used to emphasize rhythmic content of a signal.
- Set threshold so that only the peaks of the signal exceed the threshold and then set gate/expander so that it reduces the rest of the signal. Goal is to increase the distance between the peaks and the rest of the signal. Example gate for drum overheads:
- Gates and expanders can be used to emphasize rhythmic content of a signal.
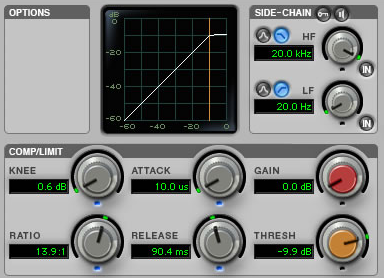
- Over-Compression
- Heavily compressing a track can be an effective way to help it sit better in the mix. For a signal with bright, loud transients, this is a good way to get it to take a step back in the mix and blend better with other elements.
- This is achieved by low threshold, higher ratio, and fast attack (gives a “smooth over” effect). Example on a drum loop:
- De-Esser
- De-Esser is a compressor specifically tuned to respond to certain frequencies, usually the sibilant frequencies between 6 kHz and 8 kHz.
Subgroups
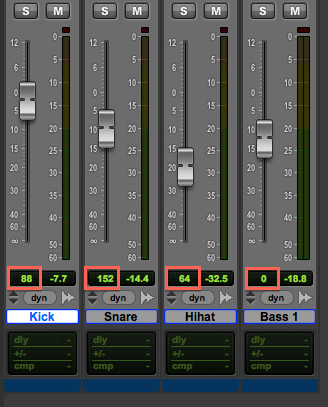
- Buses
- Bus: internal signal path from one point of a session to another
- Can assign the output of a track to a bus or set up a send to a bus
- For example, you would like to make EQ changes to the whole drum section. You would set up the output to a specific bus then create an Aux track and have the input be the outputs for the drums.
- CMND + click on the solo button on the aux track puts it in solo safe mode. This way, just solo-ing a track going to an aux would make it soloed so you would not have to solo the individual track and the aux in order to get a soloed sound.
- Here is good for gentle EQ and gentle compression
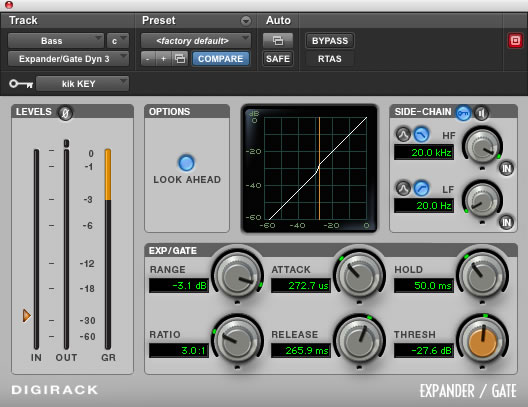
- Externally Keying Dynamics Processors (sidechaining)
- One signal would go through the audio path but another signal acts as the key signal that triggers the detector
- Send to a mono bus, do not use master output
- Example: use snare signal to control gate on overheads to give more groove
- Typically only use 2 to 3 dB of gain reduction on gate for this instance.
- Example: put gate on bass drum with kick as the trigger, see screenshot:
- Bus: internal signal path from one point of a session to another
- Can also use this technique to make a sine wave kick drum for hip-hop or use this in more subtle ways to give kick drum more tone
- Open signal generator on an Aux track followed by a gate. Have kick/snare trigger the gate open. Either have high frequency white noise (for snares) or low frequency sine (for kick).
- Keyed Compressors
- With a gate, the bass is slightly louder on each kick strike while a compressor does the opposite.
- With a very fast attack and release, the bass gets slightly compressed (just a few dB gain reduction) on each kick strike. This would quickly push the bass out of the way so that the kick attack can cut through the mix a little better, but it recovers quickly so that there is still good sustain from the bass note.
- VERY GOOD to have vocals trigger compressors on loud tracks in the mix that are in the way of the vocals.
- With a gate, the bass is slightly louder on each kick strike while a compressor does the opposite.
- Latency
- Some plug-ins (Dyn3 Expander/Gate, Eleven Free, Maxim, Pitch II) cause a delay so that incoming audio signal reaches detector before the same audio passes through audio.
- You can go to View/Mix Window Views/Delay Compensation to see this delay and click “Options” and check delay compensation to have pro tools automatically adjust.
- CMND click the volume parameter below the fader in the mix window in order to see the latency.
- Add time adjuster to all tracks that have a delay LESS than the longest delay. EXCLUDE Aux track because they read off of the original track.
Last edited:
 , I'm just looking to help out fellow musicians and trying to pass on knowledge I wish I had gotten sooner! Thanks for the kind words!