ObiK
IK Multimedia
New way to set the audio input in iOS7
[h=4]Apple’s new OS requires an additional step in order for your app to recognize incoming audio[/h]
If you’ve updated or are going to update to iOS 7, you'll want to know about a new procedure to activate an app for audio input. The following step-by-step explanation shows what to do — it’s not difficult — so that you’ll be able to input audio into your device as always. AmpliTube is used as an example, but the procedure is the same for all audio apps.
1. When the app first launches on iOS 7, it will ask you “AmpliTube Would Like to Access the Microphone.” Selecting 'OK' will allow you to work as usual.
2. If you select ‘Don't Allow’, you will not be able to hear any audio when playing through your iRig, iRig HD, iRig PRO, etc..
3. If ‘Don't Allow’ is selected and you hear no output, please see either of the following suggestions to correct this:
[h=4]Apple’s new OS requires an additional step in order for your app to recognize incoming audio[/h]
If you’ve updated or are going to update to iOS 7, you'll want to know about a new procedure to activate an app for audio input. The following step-by-step explanation shows what to do — it’s not difficult — so that you’ll be able to input audio into your device as always. AmpliTube is used as an example, but the procedure is the same for all audio apps.
1. When the app first launches on iOS 7, it will ask you “AmpliTube Would Like to Access the Microphone.” Selecting 'OK' will allow you to work as usual.
2. If you select ‘Don't Allow’, you will not be able to hear any audio when playing through your iRig, iRig HD, iRig PRO, etc..
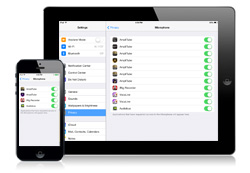
3. If ‘Don't Allow’ is selected and you hear no output, please see either of the following suggestions to correct this:
- A. Open your Settings app and tap on ‘Privacy’ > ‘Microphone’. You will see various audio apps listed, tap the slider to the right of the app and tap it so it appears green in color. This will allow access to the microphone and audio will be heard again.
- B. This option involves settings enabling restrictions, which some users may not want to do. If you do not wish to enable restrictions on your device, please see option 1 above to resolve the problem. Open your Settings app and tap on ‘General’ > ‘Restrictions’ > tap ‘Enable Restrictions’ > ‘Microphone’ > tap ‘Allow Changes’.