hamstank
New member
Hi all! This next guide is about automation and getting the final mix ready for export. This is one of the more Pro Tools intensive guides, but even if you don't use Pro Tools, you can definitely get some knowledge out of it. Definitely check the end too if you're curious about Limiting. This could be beneficial to get your mix to the level you want it without compromising the sound quality!!!
My other guides:
EQ
Dynamics 1
Dynamics 2
Reverb
Delay, Chorusing, Flanging
Realtime Automation Modes (This section is for PT, but many DAWs have similar settings)
***SHIFT + SPACE BAR PLAYS BACK AT HALF SPEED***
Sends Automation
Plug-In Automation
Creative Strategies and Uses for Mix Automation
Make My Mix LOUD!
***ALWAYS PUT IN THE LAST SLOT IN THE MASTER FADER***
Bouncing Your Mix to Disk
My other guides:
EQ
Dynamics 1
Dynamics 2
Reverb
Delay, Chorusing, Flanging
Realtime Automation Modes (This section is for PT, but many DAWs have similar settings)
***SHIFT + SPACE BAR PLAYS BACK AT HALF SPEED***
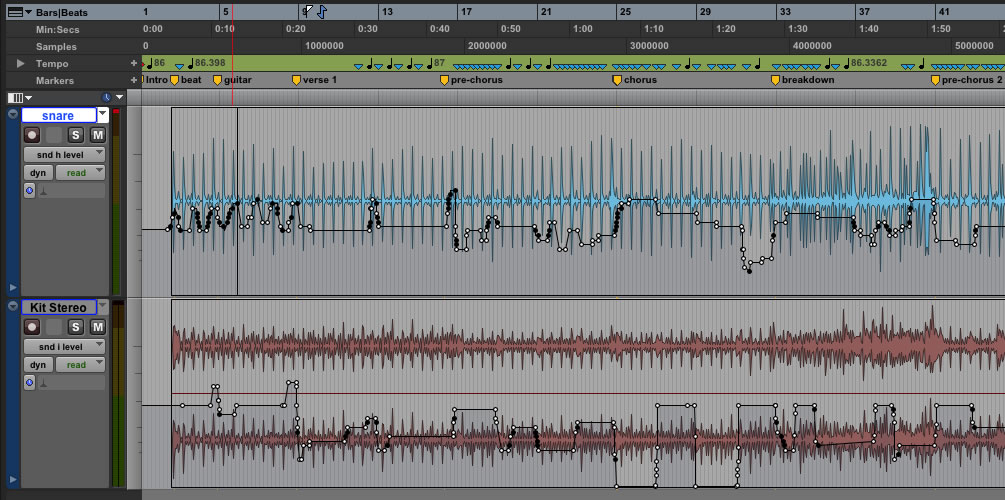
- Write Mode: overwriting automation data from the second you press play
- Touch Mode: don’t start writing automation until you “touch” the fader
- When you let go of the fader, reverts back to original level. Can change the glide time in “mixing preferences”.
- Latch Mode: same as touch mode, but when you let go of the fader, it stays were you left it
- Must be set to “Read”, if set to “off”, no automation will be read
- Automation Enable Window: located under the windows drop-down menu and can do two big things.
- Can set the record “arming” for the recording automation, aka deciding which parameters can or will be written when recording automation
- If all parameters are armed, then a write pass rewrites all of the parameters when you hit play. Touch mode is recommended here
- Can “Auto-Suspend” and shut off playback of all automation parameters in session
- Great to return to “raw” tracks and also be used as a panic button to regain control of a mix if you get too confused about what’s automated and what isn’t.
- The answer depends on the mix engineer and the project.
- Some mix engineers set up a basic (static) balance and then they add EQ and dynamics. After that they’ll add reverb to create an acoustic space as well as time-domain effects like chorusing and delays. Towards the end of the session, they’ll start to automate things to further refine the mix.
- Some mix engineers add automation early in the process. They begin their mix session by automating mutes and levels to get a working mix happening before they get really deep into EQ and dynamics processing. This is helpful if you have a session with a lot of noisy tracks or uneven levels.
- As a variation to this approach, an engineer will often automate just the mutes in the session, but hold off on adding volume automation until later on in the mixing process.
This guide has taken the first approach for practical reasons, but the ultimate decision is based on your mixing style. From project to project, your basic approach may be different.
- When you get to the automation stage of your mix, you have a few options in terms of how you’ll approach things.
- Ride Approach: “Ride” the levels of one track from start to finish, making changes that you know you want from moment to moment. You then do the same for the next track and so on.
- This means building the mix in “layers”. It’s a fairly common approach but does require that you have a pretty strong idea about what you need from mix automation.
- Chunk Approach: Set up a good static mix balance, and then work from there.
- You would do all of the mix automation for the first section of the music, on all tracks, until you’re satisfied and then move to the next section. This is essentially building a mix in “chunks” using the basic static mix as the baseline you work from.
Most use out of automation when moving things out of the way when you need to, constantly making room for other elements of the mix.
- Good for when you want to bridge gaps, but always good to fine tune each individual track within the group after. Be careful to not overwrite previous, crucial automation data.
- Whenever you want to ride a number of tracks at the same time, simply make a group out of them.
- Transitions are a really effective place in the mix for automation.
- As a verse builds in to a chorus, for example, it’s often helpful to push a few of the tracks in the downbeat of the chorus, to enhance the excitement of the moment. Be careful not to overdo it and sound obvious.
- Vocal Rides: the idea of moving the track level up and down to even out a vocal performance and also bring out certain syllables and consonants, especially weak ones.
- Most often, mix engineer will use compressor and vocal automation.
- Vocal rides get the track under control and bring out weak moments
- Compression evens things out
- Compressor can even out spurious transients but you can’t bring out weak syllables with a compressor unless you squash entire track
- Takes much time to add the rides, but the benefits are high
- Any instrument of performance with wide swings in the dynamics, or with certain details that need to be enhanced, can benefit from this treatment
- Most often, mix engineer will use compressor and vocal automation.
- In subtle ways, pan automation can be an effective way to add motion to a mix. Anytime you have synth pads, sustained chords of guitars and keyboards, or drone tracks, you can add a little motion by slightly moving the position of the sound around the mix. I don't mean the "ping-pong" effect, which can sometimes be more distracting than effective. Rather, just add a small amount of movement back and forth to keep the sound from stagnating in one position.
- For little flourishes, can start the pan on the left and bring it to the right (for small parts such as transitions or sound effects)
- Auto Match Indicators:
- When in touch mode, there’s a little arrow that lets you know where the automation is in relation to the position of the track.

Sends Automation
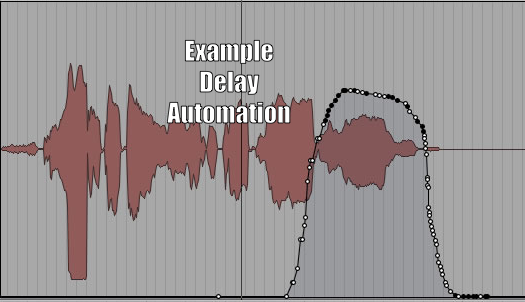
- In any mixing project, it’s common to send tracks to various effects processors such as reverbs and delays.
- Example: sending a few vocal phrases to a delay could be interesting, while continual delay effect can be monotonous
- Sending reverb to automation can be a subtle effect
- Example: Sending the snare to reverb can work to push the snare a bit more into the reverb in the intro, vamps, and choruses, and pull it back slightly in the verses. In a subtle way, this will make the verses feel a tiny bit smaller.
- You can also automate a send level for a whole group by linking the send levels when you first make a group.
- Example: You can use this feature to automate the send of all the guitars into chorus, or the entire drum kit into a room reverb.
Plug-In Automation
- Be careful when automating any time domain plug-in parameters, such as delay time or reverb decay time, since these parameters often “glitch”.
- Control + Option + Command to open automation arming window
- Example: Automating EQ on a guitar track. Can set up the LMF band of this EQ plug-in to around 550 Hz, and gently “ride” this a few dB here and there to keep thickness of the guitar from interfering with vocals.
- Similar to frequency-dependent ducking
- Example: vary the amount of compression on a track, bypassing a gate here or there on the snare, etc.
- Example: Automating EQ on a guitar track. Can set up the LMF band of this EQ plug-in to around 550 Hz, and gently “ride” this a few dB here and there to keep thickness of the guitar from interfering with vocals.
Creative Strategies and Uses for Mix Automation
- Remember, this course has taken a systematic approach to mixing. Some engineers spend most of their time mixing in static mode and towards the end, begin to automate tracks based on their original static levels.
- You can also begin with automation, only setting levels first
- At this point of the mix, the goal of automation is corrective more than anything else.
- The engineer will use automation to perform arrangement edits (muting/unmuting parts of the song), fix problems (mute noisy tracks when there’s nothing playing, and even out unblanaced tracks (matching the loud and quiet parts of a track).
- After these steps, they’ll go back and start the process of EQ, dynamics, etc.
- On a larger scale, one of the many uses of automation is to bring out song form.
- Great way to help transitions from section to section and build the mix in such a way as to accentuate the form of the song.
- The bottom line is to try these different approaches, be consciously aware of what you've tried, and be sure to evaluate the results. You are developing a method in how you mix, and you want to be actively aware of that!
Make My Mix LOUD!
***ALWAYS PUT IN THE LAST SLOT IN THE MASTER FADER***
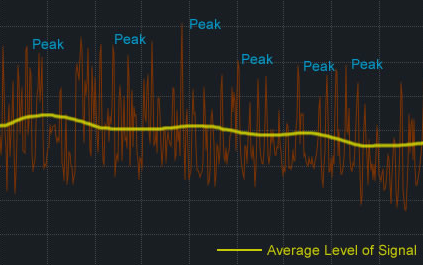
- One of the hot topics in mixing and mastering these days is the issue making a mix LOUD. When we say LOUD, however, we're not talking about turning up the volume on your stereo system. A LOUD mix means one that seems to be louder than other mixes when they are played on the same playback system, and at the same volume level.
- The reason why some mixes sound louder is because the overall average level (sometimes called the RMS, or Root Mean Squared level) is higher in certain mixes.
- Tool for making a mix loud is the mix limiter (Maximizer or Finalizer).
- The idea of making a mix LOUD is something more for mastering than in actual mixing.
- While mixing, generally a good idea to concentrate on getting the mix levels up to professional levels.
- While mixing, good idea to use a plug-in like Maxim not to make the mix slamming LOUD, but simply to bring the level up so that it’s peaking at just below 0 dBfs.
- Maxim Parameters
- Ceiling: sets the maximum peak level possible – the signal will never go higher than this level
- For finalizing a mix, usually set around -1 dB or maybe even -2 dB to leave headroom for mastering.
- Threshold: lowering the threshold limits the peaks of the signal, but plug-ins like Maxim also have an auto make-up gain feature which raises the overall signal level as you lower the threshold
- SHOULDN’T BE TOO MUCH GAIN REDUCTION, DON’T SQUASH DYNAMICS
- Ceiling: sets the maximum peak level possible – the signal will never go higher than this level
Bouncing Your Mix to Disk
- After taking a break and giving your ears a rest, just sit back and give it a good listen, trying to hear it with fresh ears, as if you're hearing it for the very first time. There are some tricks mix engineers use:
- Turn off the computer monitor or hide Pro Tools so there’s nothing to watch on screen
- Listen to it at a lower level; different details will come out
- Swap the left and right channels; this will give a renewed perspective and you can hear the sounds differently
- Listen from the next room or in the hallway, keeping the door open
- When it comes time to bounce the mix, you have to make decisions about the bit resolution.
- The most common choice is to make a 24-bit bounce, not just for the mix file but for the version being distributed to the consumer.
- If you want to be able to burn a bounce onto an audio CD, you’ll need a 16-bit version of your mix.
- When you’re bouncing, the problem is the output of the PT session is still 24-bit. The bounce will simply truncate each digital audio word from 24 to 16 bits, lopping of the last 8 bits of each digital word. This can cause a type of distortion called quantization distortion and it’s very undesirable. To correct this problem, you can dither the audio in the conversion from 24 to 16 bits.
- Dithering: reducing the resolution of an audio signal from 24 to 16 bits, which could be done with the Dither plug-in.
- Always important to go last in the master fader plug-in chain.
- If you have the option to use noise-shaped dither, you should use it.
- POW-r dither offeres better sonic quality when reducing the bit resolution
- Fading Out: Some mix engineers insist on performing the fade while others leave it to the mastering engineer.
- Bouncing
- Stereo Interleaved: audio files contain 2 channels of audio in one file
- Multiple Mono: a stereo recording is contained within 2 mono files with the extensions .L and .R
- This is the file format used in Pro Tools sessions.
- Good idea to include “bounce” in the name and “16” or “24” as well
Last edited: