Was just wondering if anyone could explain what Diffusion/ Depth/ Amount all mean and how they are different.. I tried looking on the net but all the explanations are either way to in-depth for a noob to understand or they just plain don't make any sense.. any feedback would be appreciated thanks!
You are using an out of date browser. It may not display this or other websites correctly.
You should upgrade or use an alternative browser.
You should upgrade or use an alternative browser.
Diffusion, Depth, Amount..
- Thread starter Sequence2
- Start date
Rapper's Friend
New member
Diffusion is sound running through an acoustic environment. The sound gets diffracted, reflected, and absorbed similar to light. Saying you have a 'diffuse' environment basically saying the sound sounds the same in all areas of the environment.
---------- Post added at 04:12 PM ---------- Previous post was at 04:08 PM ----------
For instance, let's take my apartment for instance. I sit at my monitors and play a track on them. Then I go in the bathroom, and now the track sounds a little different. Certain frequencies are more/less prominent, etc.... My apartment is an example of a non-diffuse environment. Getting a 'perfectly' diffuse environment is pretty much impossible.
E
Emmapeel9
Guest
It would help to know what you are refering to here - the word "amount" could mean a lot of things.
What I should have asked was:
While editing sounds within my DAW (Ableton) I sometimes use the Reverb effect which has numerous editing effects added to it. One of them being Early reflection. The Parameter Uses an X-Y controller to edit the Early reflections. While reading information about how to properly use this effect I came across this explanation
Spin – This setting applies modulation to the early reflections with an X-Y controller. Sliding the controller to the left and right affects the depth of modulation, while sliding up and down affects the amount.
The explanation makes sense, but I still don't understand what Amount or Depth are actually doing to the sound when I change them within the X-Y controller.
Any feedback would be appreciated
Thanks!
Rapper's Friend
New member
I don't use Ableton. I'm not sure on the specific details of that plugin, but it's probably something like this: depth changes the quality of the reverb and amount changes wet/dry the sound is (how much of the sound is reverb and how much is the original sound).
E
Emmapeel9
Guest
I agree - I think amount probably refers to the wet/dry status of the reverb. Check it to see if that is what it sounds like it is doing. 0 = no reverb, 100% = the full amount of the reverb.
Depth might refer to room size. Again, you can check this - a small amount will sound like you are in a bathroom, a lot will sound like you are in a church or big hall.
I think diffusion refers to how non-standard the room is.
Different reverbs have different settings so it is good to check with your ear what they are doing.
Incidently, I've never heard of "spin" on a reverb before.
bandcoach
Zukatoku - Mod Scientist
What I should have asked was:
While editing sounds within my DAW (Ableton) I sometimes use the Reverb effect which has numerous editing effects added to it. One of them being Early reflection. The Parameter Uses an X-Y controller to edit the Early reflections. While reading information about how to properly use this effect I came across this explanation
Spin – This setting applies modulation to the early reflections with an X-Y controller. Sliding the controller to the left and right affects the depth of modulation, while sliding up and down affects the amount.
The explanation makes sense, but I still don't understand what Amount or Depth are actually doing to the sound when I change them within the X-Y controller.
Any feedback would be appreciated
Thanks!
Diffusion is simply the spread of anything, water, sound, light, on-axis and off-axis. When lighting for video you want a diffuse, even spread of light in some situations and a tight, non-diffuse spot of light for other situations.
Tweeters in PA systems tend to be non-diffuse transducers, having a very tight on-axis focus. It is why most PA systems use an array of tweeters that are spread through the range of the room to ensure an even spread of high frequency sound. Sub-Bins and Mid-Bins tend to be more diffuse and evenly spread in how they transduce (convert) electricity into sound waves, some of this is to do with the nature of low frequency sounds, some of this is to do with the design of the speaker systems and arrays they are used in.
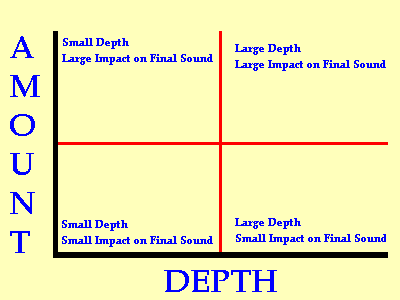
Your plug-in is basically offering you the opportunity to affect the way in which the early reflections appear to move in the environment (spin). Depth is simply how much modulation (spin) you apply to them. Amount is simply how much of the spin modulation you add to the output, sort of like a mix slider to bring in as much of this part of the effect as you want. Don't confuse the left-right with a panning option, it is more of a point in 2-D space that corresponds to the overall impact of the effect, e.g.